If you have forgotten your administrator password for Windows, you can use a Ubuntu Linux live CD or live USB to reset the password. This tutorial will show you how to do that, step by step.
There are many ways to get Ubuntu Linux. You can find more details about that here.
If you run into any problems or have any questions, the folks at the Ubuntu Forums are very helpful and friendly.
I will not be answering any support questions posted as comments here.
Step 1: Boot up Ubuntu
With the Ubuntu CD in your optical drive or with the Ubuntu USB plugged into your computer, make sure your BIOS is set to boot from CD or USB before your hard drive. You can usually enter your BIOS settings by pressing F1, F2, F9, F10, F12, Esc, or Del during bootup, depending on the kind of computer you have.

After Ubuntu boots up, you’ll be asked if you want to try Ubuntu or install it. You definitely want to just try it at this point.
Step 2: Install the password reset software
Installing software on Ubuntu is a bit different from installing software on Windows. Instead of going to a website to download setup files, you just tell the software package manager what you want installed, and it fetches it for you off some servers. It’s a lot like the iTunes App Store or Android Market.
This does assume that you have a working internet connection (wired preferred, but wireless can work, too). If, for some reason, your internet connection isn’t working on the computer you want to reset the password for, you can also download the chntpw .deb using another computer, transfer it over via USB, and then double-click it to install it.
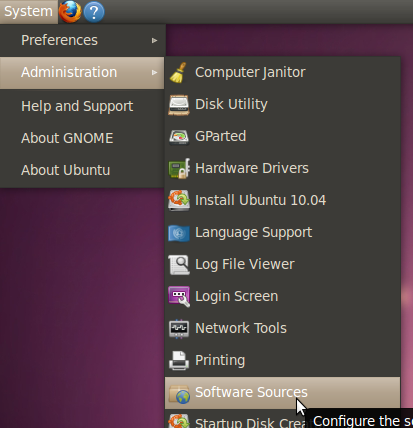
First we want to make sure we have the proper software sources enabled to install chntpw.
Go to System > Administration > Software Sources
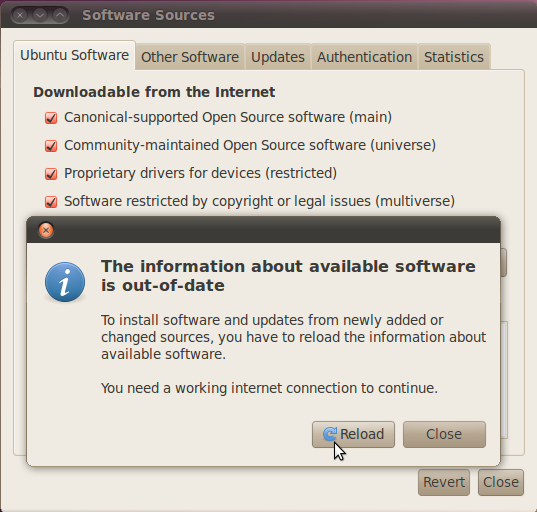
Make sure both the Universe and Multiverse repositories are checked (or “ticked,” if you’re not American). Click Close and then, when prompted, click Reload.

Wait for the information about available software to reload.
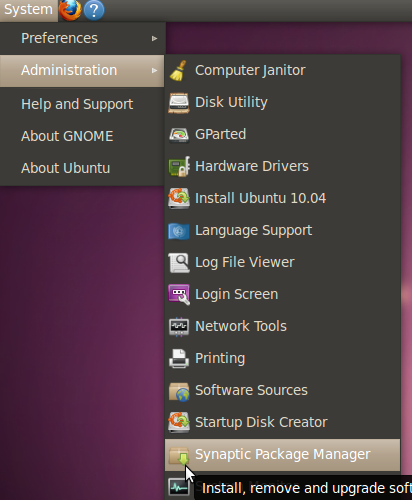
Go to System > Administration > Synaptic Package Manager
(Note: to those of you who have installed software in Ubuntu before, you actually do—at least as of Ubuntu 10.04—have to go to Synaptic to install chntpw. You can’t install it through Ubuntu Software Center).
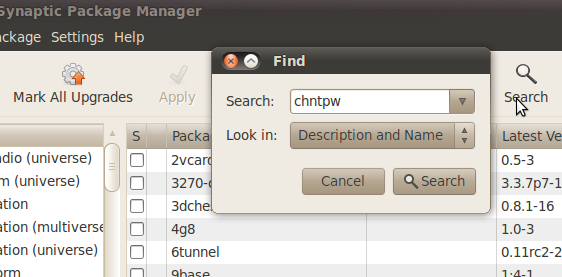
Press Control-F or click on the Search button to get the search dialogue up. Then search for chntpw.
(Note: you may be tempted to type chntpw into the search filter but it won’t show up there, since Synaptic hasn’t had time to rebuild the search index for quick filtering.)
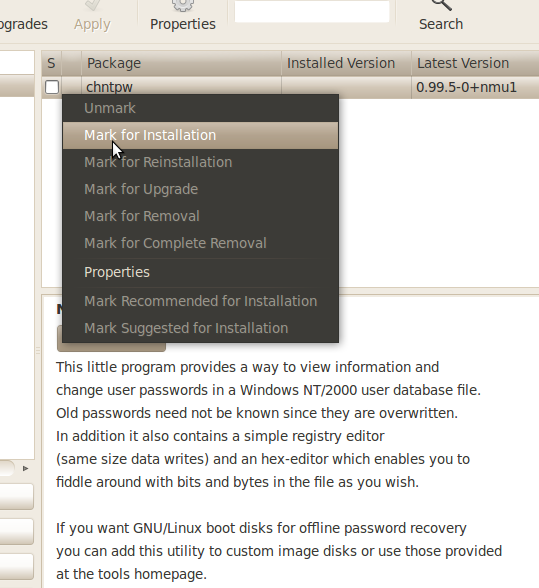
Once chntpw pops up in the search results, right-click it and select Mark for Installation.
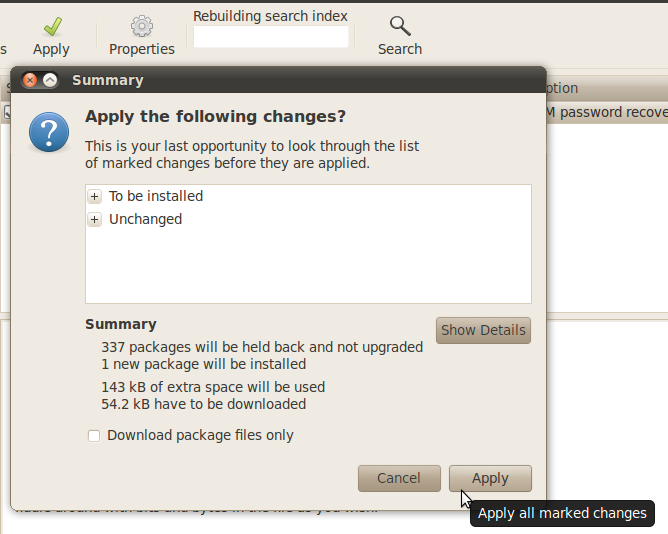
Click Apply, and then, when prompted, click Apply again.

Wait for the Synaptic to download and install chntpw.
Step 3: Mount your Windows drive
In order for you to reset your Windows password, you have to make the Ubuntu live session know that your Windows drive is available for use. This process is called “mounting.”

To mount Windows, just click on Places and then select your drive. It will be listed by the size of the drive (in this example, 80 GB).
Step 4: Reset your password
chntpw is a terminal-based (not point-and-click) application, so to use it, we’ll have to open up a command-line terminal. Don’t be intimidated. I’ll walk you through the process.
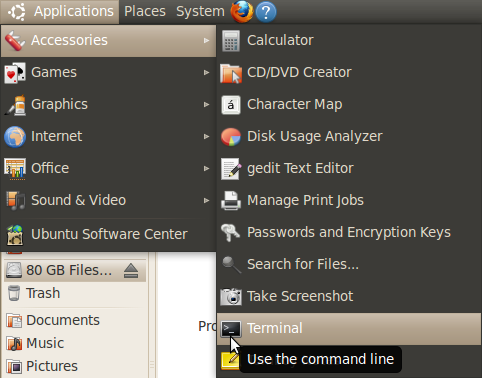
To open the terminal, go to Applications > Accessories > Terminal
I’m going to be offering a lot of explanation for those who aren’t experienced with the terminal and commands, but if you want to just skip over all that stuff, feel free to just pay attention to the terminal commands and ignore the explanations.
First, you’re going to cd (change directories) to the right Windows directory.
Start typing cd /media/ and then hit the Tab key, and it’ll autocomplete with the address of your mounted Windows drive.
Then type W and hit Tab again to get to either Windows (Windows 7) or WINDOWS (Windows XP). Yes, the terminal is case-sensitive, so upper- and lower-case matters!
Type S or s and hit Tab again to get System32 or system32 (again depending on whether it’s Windows 7 or Windows XP—I forget which it is for Windows Vista).
And do the same for config.
Tab completion makes things a lot simpler, so you don’t have to type every single word out. It also avoids the whole typo issue, in case you aren’t a good typist.
Once you’ve gotten to cd /media/name-of-your-windows-drive/Windows/System32/config or cd /media/name-of-your-windows-drive/WINDOWS/system32/config, hit Enter.
You should then type in sudo chntpw -u username SAM, where username is your actual username. For example, if your username is susan, it should be sudo chntpw -u susan SAM
After you type that in, hit Enter, and you’ll see a whole bunch of terminal output, most of which you can ignore:
Hive
ROOT KEY at offset: 0x001020 * Subkey indexing type is: 666c
Page at 0x7000 is not ‘hbin’, assuming file contains garbage at end
File size 262144 [40000] bytes, containing 6 pages (+ 1 headerpage)
Used for data: 260/20240 blocks/bytes, unused: 9/4144 blocks/bytes.
* SAM policy limits:
Failed logins before lockout is: 10
Minimum password length : 4
Password history count : 4
| RID -|———- Username ————| Admin? |- Lock? –|
| 01f4 | Administrator | ADMIN | dis/lock |
| 01f5 | Guest | | dis/lock |
| 03e8 | susan | ADMIN | |
———————> SYSKEY CHECK <-----------------------
SYSTEM SecureBoot : -1 -> Not Set (not installed, good!)
SAM Account\F : 0 -> off
SECURITY PolSecretEncryptionKey: -1 -> Not Set (OK if this is NT4)
Syskey not installed!
RID : 1000 [03e8]
Username: susan
fullname:
comment :
homedir :
User is member of 1 groups:
00000220 = Administrators (which has 4 members)
Account bits: 0x0214 =
[ ] Disabled | [ ] Homedir req. | [X] Passwd not req. |
[ ] Temp. duplicate | [X] Normal account | [ ] NMS account |
[ ] Domain trust ac | [ ] Wks trust act. | [ ] Srv trust act |
[X] Pwd don’t expir | [ ] Auto lockout | [ ] (unknown 0x08) |
[ ] (unknown 0x10) | [ ] (unknown 0x20) | [ ] (unknown 0x40) |
Failed login count: 0, while max tries is: 10
Total login count: 100
This part is important, though:
1 – Clear (blank) user password
2 – Edit (set new) user password (careful with this on XP or Vista)
3 – Promote user (make user an administrator)
(4 – Unlock and enable user account) [seems unlocked already]
q – Quit editing user, back to user select
Select: [q] >
I would highly recommend typing 1 to blank the password instead of editing the password. After you type that, hit Enter, and you should see
Hives that have changed:
# Name
0
Write hive files? (y/n) [n] :
Type y and hit Enter to confirm the change. Once you see
then you’re done.
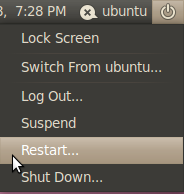
Now you can reboot, and you can log into your admin account with a blank password. Once you’re logged in, you can go to the Control Panel to change your password to something else—something you can remember.
If you’re curious, you can see an older version of this page.
Thank you for this it really worked for my Windows Vista. The only thing I have to change was in the chntpw line:
sudo chntpw -u ‘Vic Glez’ SAM
for
sudo chntpw -u ‘Vic Glez’ sam
Best regards.
Awesome! The best tutorial on the internet for doing this! Thanks!
Awesome awesome awesome. Worked brilliantly. I lost the password to my WinXP VirtualBox and this howto was exactly what I needed.
Thank you!
Saved the day1 Thanks a lot.
A tip from me if you don’t have Ubuntu on any USB or CD is to save yourself some time and use NTpasswd+Unetbootin (be sure to get the newest stable ISO from the site) instead.
That’s just my opinion on the matter though and I’m sure for some the above method is preferable, though I always keep an USB with NTPasswd handy. :-)
Without any prior knowledge of Ubuntu, I’m lost. Starting at the beginning, in terminal it shows ubuntu@unbuntu:~$ When I add the cd/media/ it doesn’t autocomplete and if I type in all the rest, it finds “No such file or directory” Where did I go wrong? I have downloaded the latest edition of Ubuntu. When I tried to install the first package from my flash drive, I was told that the software already existed. Do I need to find the software first and then type in the given command?
Question. What if the user account is on an NT domaine?
for example : toto\mike
on the “toto” NT domaine and my user name is mike. Then does this approach work? or is the pwd checked on the domaine controler? It should work on laptops I guess, since you can log in without being on the network at the office…
Do I need to put the domaine name in the password tool?
Thanks
@Janis_2
This isn’t really the place to ask for support. You should go to the Ubuntu Forums for that. I will tell you you’re missing a space between cd and /media/, though. Anything beyond that, the forum folks can help you with.
@dan
I don’t believe this will work for domain passwords, only local ones. If you need a domain password changed, you need to contact your workplace’s network administrator.
There is a simpler solution. ophcrack. Download the .iso burn to a cd and boot from it. it will run a scan and will give you the Windows passwords. Write them down. Reboot into Windows and use the Passwords it provides.
You can also use “Hirens Boot Cd”
It contains pre-installed ‘chntpw’,S no need to install it through ubuntu(linux)
and its easy too
its also contain many other utilites(defrag.,partition manager,cracking tools,networking tools,registry tools,Image making tools,and many more )
you can Download it from any Torrent Site.
Happy Surfing! ! ! ..
Exactly what I needed. Thank you very much.
Great tutorial, thank you very much for that.
It really works as you described. It rarely happens… :)
seriously awesome!!!uve earned yourself a fan!!^_^
i try using your tutorial but when i login the password still there. What wrong?
This tutorial is top-notch. It’s better than the “professional” documentation included with many technology products. Kudos!
thank yall so much my sister got her notbook and lost the password but this work. just a not you must restart 2x on a dell dont know y but i did and BOW no password thank so much
This fantastic tutorial just saved me an afternoon reinstalling XP on an old laptop!
Great work!
I hardly ever write on blogs but I think it would be helpful here. This blog really helped me at a customer today… They have an Intel fakeraid card that doesn’t work without some tricks. All the automatic linux tool disks didnt work because of this. I needed to use:
DMRAID + kpartx to get the volume to work. Then mounting was fine and I was able to use this tool. Again, the biggest problem was the RAID5 volume being mounted.
*********************************************************
ubuntu@ubuntu:/dev/mapper$ sudo dmraid -r
/dev/sda: isw, “isw_bhbaafbegd”, GROUP, ok, 312581806 sectors, data@ 0
/dev/sdc: isw, “isw_bhbaafbegd”, GROUP, ok, 312581806 sectors, data@ 0
/dev/sdb: isw, “isw_bhbaafbegd”, GROUP, ok, 312581806 sectors, data@ 0
ubuntu@ubuntu:/dev/mapper$ sudo dmraid -ay
RAID set “isw_bhbaafbegd_Raid 5” already active
RAID set “isw_bhbaafbegd_Raid 51” was not activated
ubuntu@ubuntu:/dev/mapper$ sudo mount -t ntfs-3g /dev/mapper/
control isw_bhbaafbegd_Raid 5 isw_bhbaafbegd_Raid_5
ubuntu@ubuntu:/dev/mapper$ sudo mount -t ntfs-3g /dev/mapper/isw_bhbaafbegd_Raid\ 5 /mnt
NTFS signature is missing.
Failed to mount ‘/dev/mapper/isw_bhbaafbegd_Raid 5’: Invalid argument
The device ‘/dev/mapper/isw_bhbaafbegd_Raid 5’ doesn’t seem to have a valid NTFS.
Maybe the wrong device is used? Or the whole disk instead of a
partition (e.g. /dev/sda, not /dev/sda1)? Or the other way around?
********************************************************************************
****************************** Then the file names were all messed up **
********************************************************************************
ubuntu@ubuntu:/dev/mapper$ sudo mount -t ntfs-3g /dev/mapper/isw_bhbaafbegd_Raid5 /mnt
ntfs-3g: Failed to access volume ‘/dev/mapper/isw_bhbaafbegd_Raid5’: No such file or directory
ntfs-3g 2010.3.6 external FUSE 28 – Third Generation NTFS Driver
Configuration type 1, XATTRS are on, POSIX ACLS are off
Copyright (C) 2005-2007 Yura Pakhuchiy
Copyright (C) 2006-2009 Szabolcs Szakacsits
Copyright (C) 2007-2010 Jean-Pierre Andre
Copyright (C) 2009 Erik Larsson
Usage: ntfs-3g [-o option[,…]]
Options: ro (read-only mount), remove_hiberfile, uid=, gid=,
umask=, fmask=, dmask=, streams_interface=, syncio.
Please see the details in the manual (type: man ntfs-3g).
Example: ntfs-3g /dev/sda1 /mnt/windows
Ntfs-3g news, support and information: http://ntfs-3g.org
ubuntu@ubuntu:/dev/mapper$ sudo mount -t ntfs-3g /dev/mapper/isw_bhbaafbegd_Raid /mnt
ntfs-3g: Failed to access volume ‘/dev/mapper/isw_bhbaafbegd_Raid’: No such file or directory
ntfs-3g 2010.3.6 external FUSE 28 – Third Generation NTFS Driver
Configuration type 1, XATTRS are on, POSIX ACLS are off
Copyright (C) 2005-2007 Yura Pakhuchiy
Copyright (C) 2006-2009 Szabolcs Szakacsits
Copyright (C) 2007-2010 Jean-Pierre Andre
Copyright (C) 2009 Erik Larsson
Usage: ntfs-3g [-o option[,…]]
Options: ro (read-only mount), remove_hiberfile, uid=, gid=,
umask=, fmask=, dmask=, streams_interface=, syncio.
Please see the details in the manual (type: man ntfs-3g).
Example: ntfs-3g /dev/sda1 /mnt/windows
Ntfs-3g news, support and information: http://ntfs-3g.org
**********************************************************************************************************
*****************Then finally after reading this forum —> http://www.linuxquestions.org/questions/linux-hardware-18/mounting-an-ntfs-raid-0-stripe-in-ubuntu-9-04-64-bit-769017/page2.html
***************** There is some weird behavior with the names that are listed in the /dev/mapper/ I finally tried to use the “isw_bhbaafbegd_Raid_5” with the “_”
**********************************************************************************************************
ubuntu@ubuntu:/dev/mapper$ sudo kpartx -a /dev/mapper/
control isw_bhbaafbegd_Raid 5 isw_bhbaafbegd_Raid_5
ubuntu@ubuntu:/dev/mapper$ sudo kpartx -a /dev/mapper/isw_bhbaafbegd_Raid
failed to stat() /dev/mapper/isw_bhbaafbegd_Raid
ubuntu@ubuntu:/dev/mapper$ sudo kpartx -a /dev/mapper/isw_bhbaafbegd_Raid\ 5
device-mapper: reload ioctl failed: Invalid argument
********* This one worked ***********
ubuntu@ubuntu:/dev/mapper$ sudo kpartx -a /dev/mapper/isw_bhbaafbegd_Raid_5
ubuntu@ubuntu:/dev/mapper$ mount -t ntfs-3g /dev/mapper/
control isw_bhbaafbegd_Raid_5 isw_bhbaafbegd_Raid_5p1
isw_bhbaafbegd_Raid 5 isw_bhbaafbegd_Raid 5p1
ubuntu@ubuntu:/dev/mapper$ mount -t ntfs-3g /dev/mapper/isw_bhbaafbegd_Raid_5
isw_bhbaafbegd_Raid_5 isw_bhbaafbegd_Raid_5p1
ubuntu@ubuntu:/dev/mapper$ mount -t ntfs-3g /dev/mapper/isw_bhbaafbegd_Raid_5 /mnt
mount: only root can do that
ubuntu@ubuntu:/dev/mapper$ sudo mount -t ntfs-3g /dev/mapper/isw_bhbaafbegd_Raid_5 /mnt
NTFS signature is missing.
Failed to mount ‘/dev/mapper/isw_bhbaafbegd_Raid_5’: Invalid argument
The device ‘/dev/mapper/isw_bhbaafbegd_Raid_5’ doesn’t seem to have a valid NTFS.
Maybe the wrong device is used? Or the whole disk instead of a
partition (e.g. /dev/sda, not /dev/sda1)? Or the other way around?
ubuntu@ubuntu:/dev/mapper$ sudo mount -t ntfs-3g /dev/mapper/isw_bhbaafbegd_Raid_5p15 /mnt
ntfs-3g: Failed to access volume ‘/dev/mapper/isw_bhbaafbegd_Raid_5p15’: No such file or directory
ntfs-3g 2010.3.6 external FUSE 28 – Third Generation NTFS Driver
Configuration type 1, XATTRS are on, POSIX ACLS are off
Copyright (C) 2005-2007 Yura Pakhuchiy
Copyright (C) 2006-2009 Szabolcs Szakacsits
Copyright (C) 2007-2010 Jean-Pierre Andre
Copyright (C) 2009 Erik Larsson
Usage: ntfs-3g [-o option[,…]]
Options: ro (read-only mount), remove_hiberfile, uid=, gid=,
umask=, fmask=, dmask=, streams_interface=, syncio.
Please see the details in the manual (type: man ntfs-3g).
Example: ntfs-3g /dev/sda1 /mnt/windows
Ntfs-3g news, support and information: http://ntfs-3g.org
************************************************************************************
*************************** FINALLY!! WHoooo hoo! ************
************************************************************************************
ubuntu@ubuntu:/dev/mapper$ sudo mount -t ntfs-3g /dev/mapper/isw_bhbaafbegd_Raid_5p1 /mnt
Does it works for Windows 7?
I followed all the steps and it’s not working for me, any suggestion:
u* SAM policy limits:
Failed logins before lockout is: 0
Minimum password length : 0
Password history count : 0
| RID -|———- Username ————| Admin? |- Lock? –|
| 01f4 | Administrator | | dis/lock |
| 01f5 | Guest | | dis/lock |
| 03eb | Jack | | dis/lock |
———————> SYSKEY CHECK Not Set (not installed, good!)
SAM Account\F : 0 -> off
SECURITY PolSecretEncryptionKey: -1 -> Not Set (OK if this is NT4)
Syskey not installed!
Cannot find value
Hives that have changed:
# Name
None!
I… I think I love you. This, along with the older version you were kind enough to supply a link to, covered all the bases needed to solve my remaining “trying-to-get-this-damn-thing-booted” problems.
So far, Ubuntu has been the answer every time!
Thank you for supply this new Ubuntu user with the warm, fuzzy feeling of a supportive open community (and an excellent solution to her problems). :)
You rock man! Very useful post!
One more reason Windows sucks, but handy tool to have at hand in case of emergency
Great tutorial. Who said Ubuntu was worthless ;-) ?
Hi,
Awesome excellent Thanks a lot. Its totally working
Thanks,
Sandeep
have to say it worked for my acer netbook that i purchased with a password that the seller forgot. DOH! I’m starting to like this Ubuntu stuff. new language to me but interesting. thanks again!!
Thanks a lot! You saved my day!
Great tutorial. Makes me think to switch to Ubuntu :)
Excellent tutorial! Saved my life! Thanks a lot!
I get all the stages done right, including running chntpw, but when I restart back in to Windows 7 on the HP Mini 110 it still won’t login with no password. Any suggestions? Tried # sudo chntpw -u account sam.
The file in config is lower case sam not SAM, does that mean anything?
Hi
I just used this on a WinXP. Works as a charm :-)
Thanks!
SlickSlack: Case _does_ matter in Linux. The filename SAM/sam must be in correct case, and so must the uername. It should be “Administrator”, and not “administrator”.
excellent explanation and very useful
thanks
hi
I keept getting this message after entering the command: sudo chntpw -u myusername sam
chntpw version 0.99.5 070923 (decade), (c) Petter N Hagen
openHive(sam): File does not seem to be a registry hive!
Simple registry editor. ? for help.
get_abs_path: Not a ‘nk’ node!
i then installed the 64 bit version manually and it now works….
Awesome, this is a perfect tutorial, very clear from A to Z.
Thanks, it actually worked!
Everything went according to the directions, except that it did not work for me on a Windows 7 Home Premium installation. There was one user configured (I suspect by renaming the built-in Administrator account), with an empty password. After Microsoft’s updates this week, I couldn’t log on to that user. chntpw didn’t work, either by clearing or editing the passwords on either account. ophcrack couldn’t crack any of the passwords, but did correctly identify the Guest password as empty. Finally, a utility on the pogostick site did successfully reset the user password. I was surprised at this success, since the code looked very much like chntpw when it was running. I suspect it’s all got something to do with the way the built-in Administrator account is treated in Windows 7, and would love to find a way to confirm that my user account is in fact the renamed built-in Administrator. All the utilities listed the two as separate accounts, but using “net user administrator …” commands in Windows returns internal errors. This is a relatively new installation, so hopefully no too much bit rot has set in.
Hi,
This is really cool tool. I reset a few PC with Vista it worked like a dream. Well done developer.!!!!!!
I have tried many times but it didn’t work. It seemed that the passwords had been emptied but actually they were not. Mine have three accounts:
Administrator
ecopharmacist1
Guest
After reboot, I saw both the Administrator and ecopharmacist1 on the startup window but both still required password to enter!
Anything to do with the sam limits which showed:
Failed logins before lockout is: 0
Minimum password length : 0
Password history count : 0
How to change these values?
Really thank you!
you are a life saver:) Thanks for the neat explanation!
This is good stuff but does it work with 11.04? I have downloaded NN but it seems very different to the screen images on here.
awesome tricksss…. i liked it…thanx buddy..
i created a new account but the passwords were not reset and the new account required a password also
Please Windows Password Reset remotly,
Like windows xp,Windows 7, windows 2003 server,
PLease ………………………Help me
Thanks!!! this really works! Yeay!
I gave my normally passwordless Windows account a password just to try this, and it works. This is the only tutorial I can find to do this, since most of them assume that this type of tutorial will be used by kids to hack their parents’ account. This works great, though.
Thanks so much! My 11 y o daughter forgot her W7 p/w on her netbook. This tutorial saved the day. I already have several Ubuntu distros on USB fortunately.
I 10.04.3 on my laptop so the terminal commands here weren’t too daunting (with my 13 y o son’s help!!)